Showing posts with label Redcrow. Show all posts

Tuesday, November 27, 2012

Button Options


A collections of buttons that caught my fancy a while back while digging through my collection of old buttons that have been picked up over the years...
Wood, Metal, Coconut, Shell, Plastic, and Bone.
A little self portrait in pen and ink for sum fun.

Hope your week is going in the right direction and that your projects are coming together.
Back to it...
>>>--"Keep On Crow'N--->
Cheers,
'MrRay'

Thursday, November 01, 2012

Wooden iPhone 5

Working on a few projects right now and one of them involves the I phone 5, which I do not currently have in my possession. Not sure when or if ever...

So like most things around here if I don't have it might as well make it, and make it out of wood. Jumped on the 'ol intro-net thing surfed around for a few and gots me the dimensions of the #5 and went to town on some old wooden fencing. A little elbow grease and we have a fine example of a modern convenience without all of the convenience and technologies. No calls, no web surf'n, no instagram. just wood.
More on the purpose later.
Well back to it... Hope your week has been productive and positive....
 If you are back east "god's speed" and we have you in our thoughts and wish you well.
>>>--"Keep On Crow'N--->
 Cheers,
'MrRay'

Thursday, October 25, 2012

Let's Do Some Wax'n

In having a go with a few projects and ideas involving fairly common goods it is sometimes a challenge to come up with items that are unique, have a voice, and stand apart while still being able to move about nicely in, out, and around the "crowd".

It is while dabbling in the is idea that the though occurred to me recently to have a little mess about with fabric and wax. Now this is not anything new by any means, but the end use is part of the overall story telling that I think might be quite fun when all said and done. More on that on a later date...

It has been a while since I have done any kind of Process post up. So figured share a bit on some building of a bar of wax for rubbing into some fabrics with.
 Materials needed:
-2 Pots: 1 that fits loosely inside the other to do a little double boiler action. (You don't want to melt wax directly over an open flame it could end very badly with flames and such) Or if doing a small batch could use an old soup can inside a pot.
-Water: to boil in mentioned pot.
-Stove Top: how else you going to boil the water?
-Wax: paraffin and Bee's
-Coconut Oil (optional): Smells nice and for my projects fits in with the whole story thing mentioned above. Also it helps keep the wax soft and pliable for use and adds a little bit "grease" for end use.
-Container or Mold: Use to poor the melted wax into to set up as the bar. I used an old 32oz. plastic yogurt container. 
-Food/Kitchen Scale: To measure out the right amount of wax to mix together. If you don't have one, no worries this is not chem. class it does not need to be perfect.
-Wood or Metal Spoon: To stir the wax as it melts.

Recipe:
2 part Parraffin
1 part Bee's
A few heaping Table Spoons or 1 part Coconut oil (optional)

Bash up your wax into small chunks and measure it out into your smaller pot or soup can. My blend for this round, 8oz. Paraffin / 4oz. Bee's.
Put a shallow amount of water in the larger pot and place the smaller pot / soup can  with the wax chunks into the pot and fire up the burner on the stove.

Low to Medium heat a n bring to a soft boil (not rolling just a few bubbles) As the water is warming up the chunks of wax will start to soften and melt down as well. Once the wax starts to melt you can begin to stir to help melt down the wax.

Once all the wax is melted and in a liquid form remove from heat and add the Coconut Oil by stirring it into the liquid wax until dissolved completely.

Remove small pot or can from the larger pot with togs or oven mit (caution HOT) and poor liquid wax into mold or plastic container and let set for a few hours or over night.

Once fully set, and if you are using a plastic container, like the yogurt container, you need to work the edges to loosen it up and it should, after some working it a bit, pop out. Now youz got a nice bar of wax for some fabric waxing fun.

Stay tuned for the next post, Elbow Grease and hot iron fun...

Back to it.

>>>--"Keep On Crow'N--->
Cheers,
'MrRay'


Monday, May 09, 2011

Redcrow Neckwear.

As I have been sidetracked with life and everything else but updating this here blog over the last several months, I have failed to post up some neckwear goods that I built ages ago. So as per a request for some images, I figured why not share.
Gives a Smile

Shirt Weight Bow Tie with Button Neck Adjustment. Hand Distressed Bandanna Bow Tie with Button Neck Adjustment.

Thursday, April 28, 2011

CXXVI I Phone Wallet: Work'n Together: Update

The phone wallets are in and available for purchase.

Check 'em out over at the CXXVI Clothing Co. web site.

I plan to do a little behind the scenes post on the making of these items in the next couple of days. Till then, I again want to thank the fine folks over at CXXVI for this opportunity! Now go over to their site and pick one up for yourself and tell your friends to do the same...

Cheers!

Monday, April 18, 2011

Work'n Together.

So a long long time ago via this here blog thing I received some nice complements by the good folks over at CXXVI Clothing Co. If you have never seen any of their goods you need to check 'em out! Good stuff if you ask me. The kids have their heads on straight for sure.

Well next thing you know I gots myself a little collaboration thing going with 'em and after a few back and forths via the 'ol email system and the US Postal Service the goods are almost ready to be had....
Image as seen on CXXVI Clothing Co blog.
 Check out their blog for the latest. And once the goods are up I will do a deeper post on the idea and all the work that went into make'n 'em.
Big thanks to Matt over at CXXVI!

Tuesday, October 05, 2010

R/Co. Project: Piston Tee.

 Huh, summer sure did come and go...
Been super super busy with all sorts of projects and recent travels including a quick jot down south to the 'ol home town of LA. ( more on that later) So needles to say I am way behind on sharing all the goods that have been built over the last few months. Such as this here tee...
At the beginning of summer built this graphic tee. All hand cut from stencils and hand sprayed to apply the ol' grafx.... Fun times.
A little detail of the back graphic.

If anyone out there is interested in one hit me up and I will pass it along.

So what have you been up to?

Cheers!


Monday, September 20, 2010

R/Co. Project: Travel'n Trunk


Way back at the ending of spring we needed a way to do a nice presentation, something that could carry some of the goods in a somewhat easy manner.
I have had this old trunk since I was in junior high school. My mother had put fancy stuff inside it so she decided to line it with some kitschy country striped fabric.

Well that is not exactly the look that we are going for so it needed to be redone. I was in a time crunch so decided to just cover it with some tea dyed cotton sheeting that was laying around.

After that was all complete, with industrial staples and all, it needed a way to wheel it about with some ease. So gathered up some wood from the wood pile...
and built a platform.

can't do much without a way to move it so put on some wheels.

Needed something to be able to attach the base with wheels onto the trunk so I found some old rope up in the rafters of the garage and cut her loose.

Once all complete it packed up nicely and you just wheel her away...

Fun times....
What kind of goodies have you been working on building?

Cheers.

Thursday, September 02, 2010

R/Co. Project: Wood Block Printing

 Time is fast approaching for the runway show so instead of packing snuck in a late night fabric printing test run with the compleated wood block.

The collection of goods that I am planning to send down the runway involves headwear that is built from a nice washed out navy canvas so I want the print to match back to that color. I do not have navy ink so did it the old fashioned way and just mix it up by hand.
 Got out some fabric screen printing ink that I have been meaning to use, eye balled it and went for it. A little blue, a dollop of black, a touch of red, some more blue and a touch more black and.... looks good to me (for some reason color theory dose not click in my head but if I just mess with it for a bit it somehow works out)

The hardest part about block printing fabric is getting a nice transfer onto the fabric. Smaller blocks seam to do better but that is not what we are going for here so...
Laid out some ink onto a large plate glass and rolled the brayer through it and gave the block a nice good coat of ink.

Friday, August 20, 2010

R/Co. Press: Seattle Magazine.


REDCROW & Littlecrow Seattle Magazine Sep. 2010.
Photo: Howard Petrella

 Our first little bit of press. Not too shabby if you ask me. The boys were a little crazy that day since we did a little local TV show action in the morning then headed out to Sea Mag office for the September issue shoot that afternoon. Good times!
To see a little interview pop on over here and scroll down to the bottom. Don't forget to watch me make a fool of myself by checking out the video while you are there....

Cheers.

Tuesday, August 17, 2010

R/Co. Project: Wood Block Layout.


As a winner of the SeaMags Design Competition I get to be part of this years Fashion First Runway Show in Sep. So doing some work on building out a small collection for the show. One of the pieces I plan to do some block printing and print my own fabric. More on what it is going to be used on later. But here is a peek at the layout that I worked up

and transferred onto the wood using the "photo copy" transfer method.

Now go wreck something of your own....
Cheers.

Monday, August 09, 2010

A Few Pages

A short while back put together a little layout of some images and graphics for a little booklet hand out.

There were a few copies that I did on hand tea dyed heavyweight drawing paper but they kept jaming the printer so had to go back to the nice color copy paper.

My significant other took charge and put the booklet together by sewing a piece of red string through a few holes she popped through with an awl.

I have been meaning to do a downloadable PDF of the layout. Hope to do it soon when I get some time to build out the actual redcrowgoods.com site. Soon, I will do that soon. Till then I have some new patterns I got to go hack at.

"keep em Flying"

Cheers.

Monday, August 02, 2010

R/Co. Project: Shawl Fleece.

 In most of this good 'ol USA it is rost'n and toast'n so a cold weather piece is not something on the mind, but the cold will be upon us again soon so a short while back decided to built a poly cotton jersey fleece shawl neck with a chest pocket and two side seam pockets (can't stand when fleece does not have hand pockets) for when that chill comes creeping back. Also used some hand carved wooden toggle and button that I built out of a wood dowel that was laying around. The Fit turned out a little slimmer than I would like but for a first go I think it's not to shabby. Helped REDCROW be one of winners of this years Seattle Magazine's  Seamless in Seattle design competition.

 More details when you...

Monday, July 12, 2010

R/Co. Project: Hanger

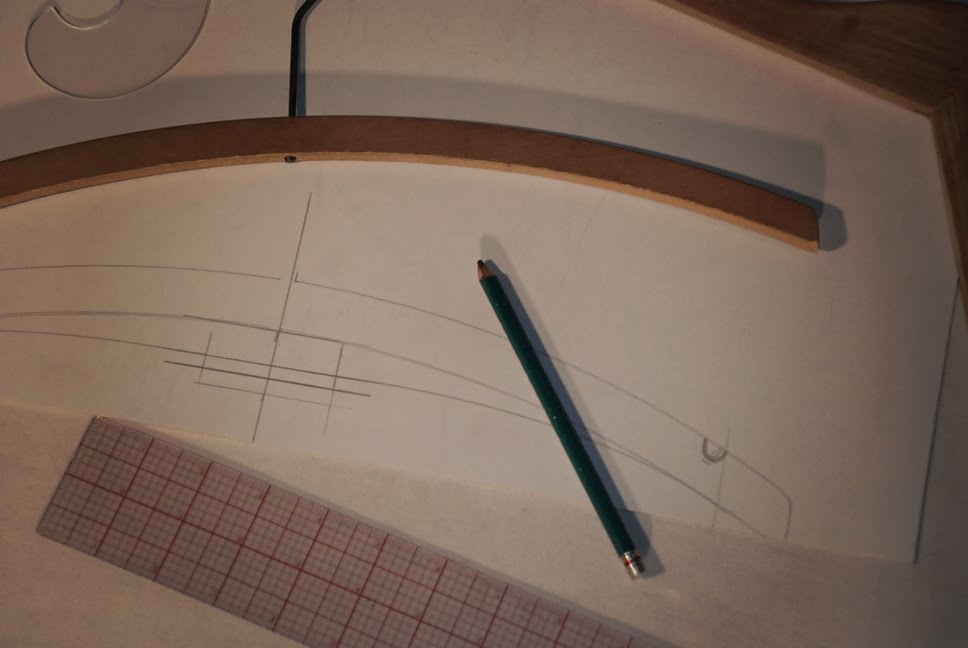
For some reason I am just never satisfied with what you can go out and buy so like most things pertaining to what we are doing with REDCROW it is only natural that instead of using readily available hangers I had to go off and build some....

A long piece of 3/4" thick wood, a skil saw, a wood rasp, sandpaper and not enough time on my hands and we are ready to go to work late into the night...

Have this old wooden hanger that I like so decided to start there for a pattern to build from. Of course made a few modifications to fit what I was after.
Sketched it out on a scrap of Oak Tag and was ready to go.
Lay out the pattern on the wood.

Sunday, July 04, 2010

R/Co Project: Trouser Bag.

When I finally get around to building things, plan on put'n the ol' trousers in a nice bag for folks.

Tuesday, June 15, 2010

R/Co. Project: Canvas & Ink

One of the pieces that got thrown together in the very early morning hours of the day I went to get judged for the design comp put on by Seattle Magazine, was this "hardware store" style apron.  I think it helped push the judges over the edge and pick REDCROW as one of this years winners. 

Made from tea dyed 10oz cotton ducked canvas, double needle construction with a two color stencil that I sprayed with cheep .79 cent paint from, where else, the hardware store. Didn't actually put on the graphic until about 10 min before I had to leave the 'ol garage for the judging... Decided to put the pencil and notebook pocket down low so it would not get covered up by the logo print on the front.

Keep it clean...

Cheers.

Tuesday, May 18, 2010

R/Co. Project: Jingle Them Keys

Tighter fitting trousers make putting your motor vehicle and house keys in the front pockets a little bit of a challenge or a bit uncomfortable. Have been rocking the keys hooked to one of the belt loops with just a regular 'ol carabiner that I picked up on one of my trips to the OR show. Not the most interesting, if you ask me, so being that I like to muck about with things I went on and built a fancy key chain.
Picked up a nice hook closure and a key ring at the local leather supply shop in Sea town and went on and dug around in the garage and came up with a nice length of leather suede that I purchased about 5 years ago on my first trip to Hong Kong.
Unearthed a few wooden beads that I have had since High School and a couple of brass beads that I traded for at the Mountain Man Rendezvous at Fort Bridger, Wyoming, back in 1996. Also came across in my bag of Mtn man/ Native Crafting goody bag a couple of spent .22 shells that I shot a poor bird with, also back in high school... wow! about time I used up this stuff,since I graduated way back in '97.

Saturday, May 01, 2010

R/Co. Project: Seeing Dots.

Man Friday morning just sucked big time. My alarm goes off way to soon, like it always does, and as I go to get out of bed the room just starts spinning... After a few attempts to get out of bed I throw in the towel and close my eyes and wait for it to stop. At one point I my bladder was so full that I had to get up and try to get to the bathroom. I made it ok but ended up falling into the tub and missed the toilet compleatly. So the whole day was a waste. I have so much that I need to get done, both at the 9-5 as well as what I want to get done out in the garage. Spending a day in bed because the world won't stop spinning when I get up is just not needed....

Anyway, for the last while the daily routine has been get up get ready for the day, go to the 9-5,  come home do the family thing, and then out to the garage till the wee hours of the morning, then repeat.
Well for the last 3 days of this routine I have been out making dots...
Yep, a whole mess load of dots.
Part of this little project I am building involves a shirt that is a navy blue ground with an allover dot pattern. Since I could not find exactly what I wanted for fabric I decided I would just have to make it....
Silly me. I don't think I will be making more than 1 and this is why....