
Friday, October 26, 2012
Thursday, October 25, 2012
Let's Do Some Wax'n
In having a go with a few projects and ideas involving fairly common goods it is sometimes a challenge to come up with items that are unique, have a voice, and stand apart while still being able to move about nicely in, out, and around the "crowd".
It is while dabbling in the is idea that the though occurred to me recently to have a little mess about with fabric and wax. Now this is not anything new by any means, but the end use is part of the overall story telling that I think might be quite fun when all said and done. More on that on a later date...
It has been a while since I have done any kind of Process post up. So figured share a bit on some building of a bar of wax for rubbing into some fabrics with.
 Materials needed:
-2 Pots: 1 that fits loosely inside the other to do a little double boiler action. (You don't want to melt wax directly over an open flame it could end very badly with flames and such) Or if doing a small batch could use an old soup can inside a pot.
-Water: to boil in mentioned pot.
-Stove Top: how else you going to boil the water?
-Wax: paraffin and Bee's
-Coconut Oil (optional): Smells nice and for my projects fits in with the whole story thing mentioned above. Also it helps keep the wax soft and pliable for use and adds a little bit "grease" for end use.
-Container or Mold: Use to poor the melted wax into to set up as the bar. I used an old 32oz. plastic yogurt container.
-Food/Kitchen Scale: To measure out the right amount of wax to mix together. If you don't have one, no worries this is not chem. class it does not need to be perfect.
-Wood or Metal Spoon: To stir the wax as it melts.
Recipe:
2 part Parraffin
1 part Bee's
A few heaping Table Spoons or 1 part Coconut oil (optional)
Bash up your wax into small chunks and measure it out into your smaller pot or soup can. My blend for this round, 8oz. Paraffin / 4oz. Bee's.
Put a shallow amount of water in the larger pot and place the smaller pot / soup can with the wax chunks into the pot and fire up the burner on the stove.

Low to Medium heat a n bring to a soft boil (not rolling just a few bubbles) As the water is warming up the chunks of wax will start to soften and melt down as well. Once the wax starts to melt you can begin to stir to help melt down the wax.

Once all the wax is melted and in a liquid form remove from heat and add the Coconut Oil by stirring it into the liquid wax until dissolved completely.

Remove small pot or can from the larger pot with togs or oven mit (caution HOT) and poor liquid wax into mold or plastic container and let set for a few hours or over night.

Once fully set, and if you are using a plastic container, like the yogurt container, you need to work the edges to loosen it up and it should, after some working it a bit, pop out. Now youz got a nice bar of wax for some fabric waxing fun.

Stay tuned for the next post, Elbow Grease and hot iron fun...
Back to it.
>>>--"Keep On Crow'N--->
Cheers,
'MrRay'
It is while dabbling in the is idea that the though occurred to me recently to have a little mess about with fabric and wax. Now this is not anything new by any means, but the end use is part of the overall story telling that I think might be quite fun when all said and done. More on that on a later date...
It has been a while since I have done any kind of Process post up. So figured share a bit on some building of a bar of wax for rubbing into some fabrics with.

-2 Pots: 1 that fits loosely inside the other to do a little double boiler action. (You don't want to melt wax directly over an open flame it could end very badly with flames and such) Or if doing a small batch could use an old soup can inside a pot.
-Water: to boil in mentioned pot.
-Stove Top: how else you going to boil the water?
-Wax: paraffin and Bee's
-Coconut Oil (optional): Smells nice and for my projects fits in with the whole story thing mentioned above. Also it helps keep the wax soft and pliable for use and adds a little bit "grease" for end use.
-Container or Mold: Use to poor the melted wax into to set up as the bar. I used an old 32oz. plastic yogurt container.
-Food/Kitchen Scale: To measure out the right amount of wax to mix together. If you don't have one, no worries this is not chem. class it does not need to be perfect.
-Wood or Metal Spoon: To stir the wax as it melts.
Recipe:
2 part Parraffin
1 part Bee's
A few heaping Table Spoons or 1 part Coconut oil (optional)
Bash up your wax into small chunks and measure it out into your smaller pot or soup can. My blend for this round, 8oz. Paraffin / 4oz. Bee's.

Low to Medium heat a n bring to a soft boil (not rolling just a few bubbles) As the water is warming up the chunks of wax will start to soften and melt down as well. Once the wax starts to melt you can begin to stir to help melt down the wax.

Once all the wax is melted and in a liquid form remove from heat and add the Coconut Oil by stirring it into the liquid wax until dissolved completely.

Remove small pot or can from the larger pot with togs or oven mit (caution HOT) and poor liquid wax into mold or plastic container and let set for a few hours or over night.

Once fully set, and if you are using a plastic container, like the yogurt container, you need to work the edges to loosen it up and it should, after some working it a bit, pop out. Now youz got a nice bar of wax for some fabric waxing fun.

Stay tuned for the next post, Elbow Grease and hot iron fun...
Back to it.
>>>--"Keep On Crow'N--->
Cheers,
'MrRay'
Wednesday, October 24, 2012

Monday, October 22, 2012
Tumblr...ing
First it was ok just to have a little blog to post up some thoughts and show a few things in the works. Then came the myspace and the facebook and the twitter and somewhere along the way there was tumblr and now the pintrest. Yes I have a pintrest. Yes I sometime only use myspace for music... well now I have joined in on the Spotify. Yes Facebook is up but not updated like it should be. Somewhere along the line I missed out on the Tumblr gig as I thought "why I have a blog" but for some strange reason I just randomly set up an account last month. Oh yeah because to post Instagram images that everyone can see outside of the silly little app they let you link up to Tumblr. Man this Tumblr thing is addicting in a strange "not sure why" kind of way. I find that I have posted up over 100 images from my camera to the random inspo images stolen from other sites on the web this month alone. I have no idea why it is any different than other blog hosting sites other than images and random quotes are all the rage over there. And I guess part of the reason I like it is it does what I was doing for a minute with the weekenders, post an image and you click on the image and it links you to the original, like a visual link list. Well that is if all of the other Tumblr kids are willing to add that little link....
Anyway just wanted to let you know that REDCROW has a Tumblr and if you want to follow along why just come on over and click that follow button up in the right hand corner.
This does not mean that this here little ol' blog spot will be left alone.... just it might not be updated as much cause I am human and that means lazy...
Well back to it... Thanks for visiting.
Cheers,
'MrRay'
Tuesday, October 16, 2012
Tipi Build: Pole Shaping

Back to it...
Cheers,
'MrRay'
Tuesday, October 09, 2012
Monday, October 08, 2012
From the Garage: 1st Boardy
As mentioned a few weeks back, have been working on a build a little Tipi. Since we find ourselves currently residing in a city by the sea and far far away from any form of a lodge pole pines I have resorted to to ripping and hand shaping all of the poles for the Tipi frame.
*Side note: this way of obtaining poles is so NOT recommended! (more on this and the details of the Tipi build later)
While digging around the looking for my draw knife to help with the pole shaping I stumbled upon one of my old suit cases tucked away on a shelf.
 Within the case I found my first pair of canvas Board Shorts that I built for a runway show I participated in a few years back while still living up in The Great Pacific Northwest. It uses canvas that I hand block printed from a block that I carved.
 Front
Front
 Back.
Back.
 Detail of the solid pocket with painted wooden button closure.
 Block Print Detail
As we get back into the swing of things with REDCROW there are a few ideas in works that tie back to this very item. Of course there will be updates with the goodies as they are put into play.
Well, a new week is upon us and is ours to grasp. Go build something and have a good one.
Back to it...
>>>--"keep On Crow'N--->
Cheers,
'MrRay'
*Side note: this way of obtaining poles is so NOT recommended! (more on this and the details of the Tipi build later)
While digging around the looking for my draw knife to help with the pole shaping I stumbled upon one of my old suit cases tucked away on a shelf.


As we get back into the swing of things with REDCROW there are a few ideas in works that tie back to this very item. Of course there will be updates with the goodies as they are put into play.
Well, a new week is upon us and is ours to grasp. Go build something and have a good one.
Back to it...
>>>--"keep On Crow'N--->
Cheers,
'MrRay'
Wednesday, October 03, 2012
In The Works.

Made it to the middle now it is on the down! Weekend fast approching.
Hope your builds are coming along nicely.
Back to it...
>>>--"Keep On Crow'N--->
Cheers,
'MrRay'
Tuesday, October 02, 2012
Make Do...
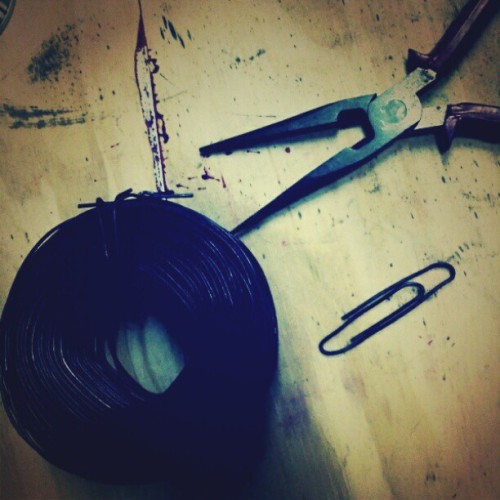
So why not make one?
Snip and bend...
Back to it.
Hope your week is shaping up to be a fine one.
Back to it...
>>>--"Keep On Crow'N--->
Cheers,
'MrRay'
Mark Your Calendars.

Should be some good times. Looking forward to it.
>>>--"Keep On Crow'N"--->
Cheers,
'MrRay'
Subscribe to:
Posts (Atom)